
SimLive for Social Media, also known as “Advanced SimLive,” enables a client to create a SimLive stream that will output to social media channels such as Facebook and YouTube.
Note: Advanced SimLive is not available for all clients. If you would like to add this product to your account, please speak with your account manager.
Prepare Your File
For Advanced SimLive, you will need to publish your Asset using our “MP4" or "MP4 (enhanced) profiles. This will create a unique MP4 for your asset that is optimized for social media platforms.


Note: The MP4 (enhanced) profile works quickly to optimize your asset for social media platforms, but it can take some time. For example, an hour-long file can take 20-40 minutes before it will be published. Please plan accordingly.
Add Backup, Pre-Roll, and Post-Roll Videos
For an optimized Advanced SimLive experience, we recommend using Backup, Pre-Roll, and Post-Roll videos. We recommend having at least a backup video and pre-roll video in your account.
In order to use these videos:
- they must be published as an MP4 in your account (not Google Drive, Dropbox, etc.) and
- assigned to your channel at least 5 minutes before your event is scheduled to begin
An explanation for each of the three videos is as follows:
- Backup
- Intention: This backup video can be triggered by you when the Advanced SimLive event is live. While this video is playing, you will be able to perform some administrative and troubleshooting tasks AND keep your event live at the same time.
- Recommendation: Create a video (at least 5 minutes long) with your organization's logo and the text "Please stand by" -- much like a TV Station's technical difficulties bumper.
- Pre-Roll
- Intention: Prior to your event's actual start time, it can take our system up to 2 minutes to initialize your Advanced SimLive. During that time, we will begin playing your scheduled content. By using a Pre-Roll video, you can ensure that your scheduled content will start on time, and not early.
- Recommendation: Create a video (at least 2 minutes long) with your organization's logo and the text "We will begin shortly" or "Welcome! We'll be starting soon."
- Play Whole Pre-Roll Video
- Intention: Using the whole pre-roll video will give your audience an clear indication as to how long before your scheduled content actually begins.
- Recommendation: Enable this feature and use a video (exactly 5 minutes long) with a 5-minute countdown timer.
- Post-Roll
- Intention: Once your scheduled content ends, we will broadcast a solid black video in the Player. Using a post-roll video will give your audience a gentle indication that your scheduled content has come to an end and they can close the player.
- Recommendation: Create a short video thanking your audience for watching, or create an advertisement for an upcoming event you would like your audience to attend.
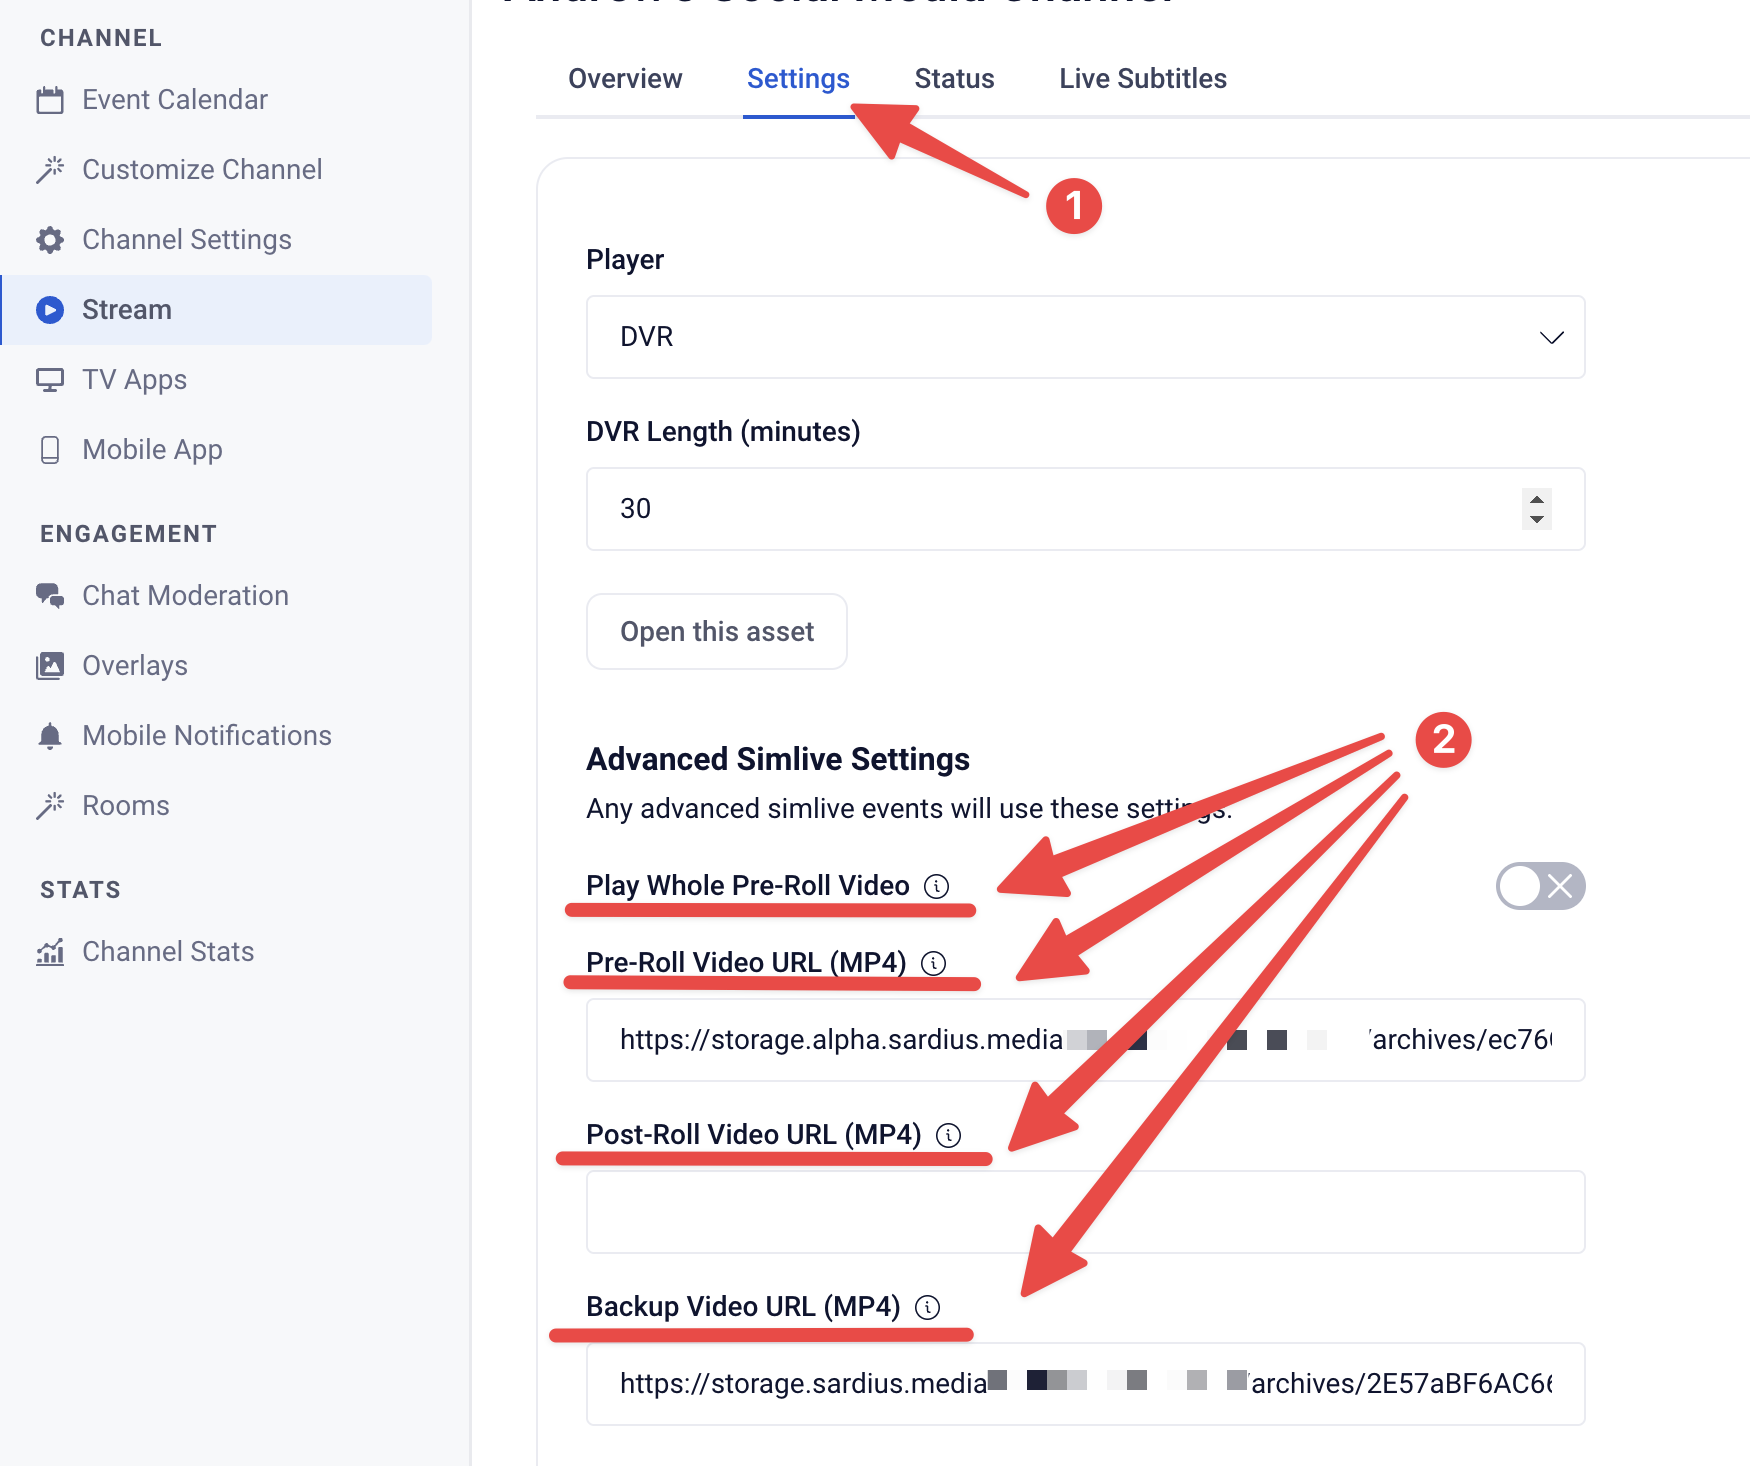
To add any of these Videos
- Access your channel's stream configuration and select the Settings tab.
- Paste the URL for any of the videos you wish to employ.
Scroll to the bottom of the page and click "Update Channel" to save these settings.
Note: These settings must be set at least five minutes before your Advanced SimLive event begins. Once you have passed this five-minute mark, and if your event has begun, you will not be able to add/change a new backup, pre-roll, and post-roll video for your Advanced SimLive.
Prepare Your Asset
SimLive only works with an Asset that is in an MP4 format.
-
If you have not yet published your asset with an MP4 format, chances are you will need to republish the file. You can learn how to do that here.
SimLive Assets must also be approved for playback. To do this,
1. Navigate to the "Asset" area of your Sardius Control Panel.
2. Select that Asset that you wish to use.
3. In the Asset's Overview tab, locate the toggle switch for “Approved” at the bottom left.
4. Click on the toggle to approve the asset.
5. Click “Update” to complete the process.

If you wish to attach an Asset to a Feed that you created,

If recording a live service to restream later, you can add the Metadata and Auto-Approve the file from the Calendar event. You can learn how to do that here.
Set up an Advanced SimLive event
To create an Advanced SimLive Event, you must create a new calendar event, given you have already set up your channel for streaming. If you have not yet created default stream settings for your account, start here, "Setup and Change Default Stream Settings"
And if you have not yet set up a calendar event before, please review the tutorial called “Adding a Calendar Event.”
Note: The following way is only used for clients streaming with the Sardius Stream protocol. For clients that have not enabled Default Stream Settings, please follow the walkthrough here
1. Locate the event you just created. Click on your event and click the Edit button. This will take you to the stream stepper overview that shows your default settings.

2. Go to the streaming tab and click on Edit default settings

3. Click Edit on your Source

4. A modal will appear. Select Simulated Live from the list and click Next to choose from Asset or Feed


After selecting your Asset or Feed that will be used for your Advanced SimLive event, you will have the option to select your social media outlets.

Note: If you would like to schedule your stream to appear a few days in advance on your Social Media outputs, please review this article: Schedule Your Event in Advance on Facebook and YouTube.
After determining where you would like your stream to be seen, take a moment to review your settings. Once you are satisfied, click “Finish” on the modal. Then click “Save” in the top right corner of the screen.

Helpful Tip: If the duration of your Asset is shorter or longer than the scheduled SimLive event, the event’s duration will not be automatically adjusted to match the Asset’s actual duration. You will have to manually update this for each event.
Live Event Controls
During the Advanced SimLive event, you will have access to several controls to make the most of the experience for your viewers. These controls are available from your channel's calendar in the Live Event Manager, and will give you the option to change from your primary to backup, pre-roll, or post-roll video.
You can learn more about these controls by reviewing this article: Managing your Advanced SimLive Event.