
How to Create an Audio Podcast Feed (RSS)
Updated
Sardius lets you transcode audio podcasts directly from your existing media library. This guide walks through the full setup — from preparing your assets to submitting your feed to Apple Podcasts, Spotify, and other podcast platforms.
Before You Start
Before creating your podcast feed, make sure you have:
- Your assets uploaded to Sardius (sermons, episodes, recordings, etc.)
- A plan for categorization — typically a Category like "Sunday Sermons Podcast" that you'll apply to every asset that belongs in the podcast
- Podcast artwork — square JPG or PNG, minimum 1400 x 1400 pixels, maximum 3000 x 3000 pixels (Apple's requirement)
- Podcast metadata ready — title, description, owner name and email, language, category (e.g., Religion & Spirituality → Christianity)
Step 1: Prepare Your Assets
Categorize your assets
The cleanest way to populate a podcast feed is by Category. This lets you use a dynamic query so new episodes automatically appear in the feed as you tag them — no manual updates needed.
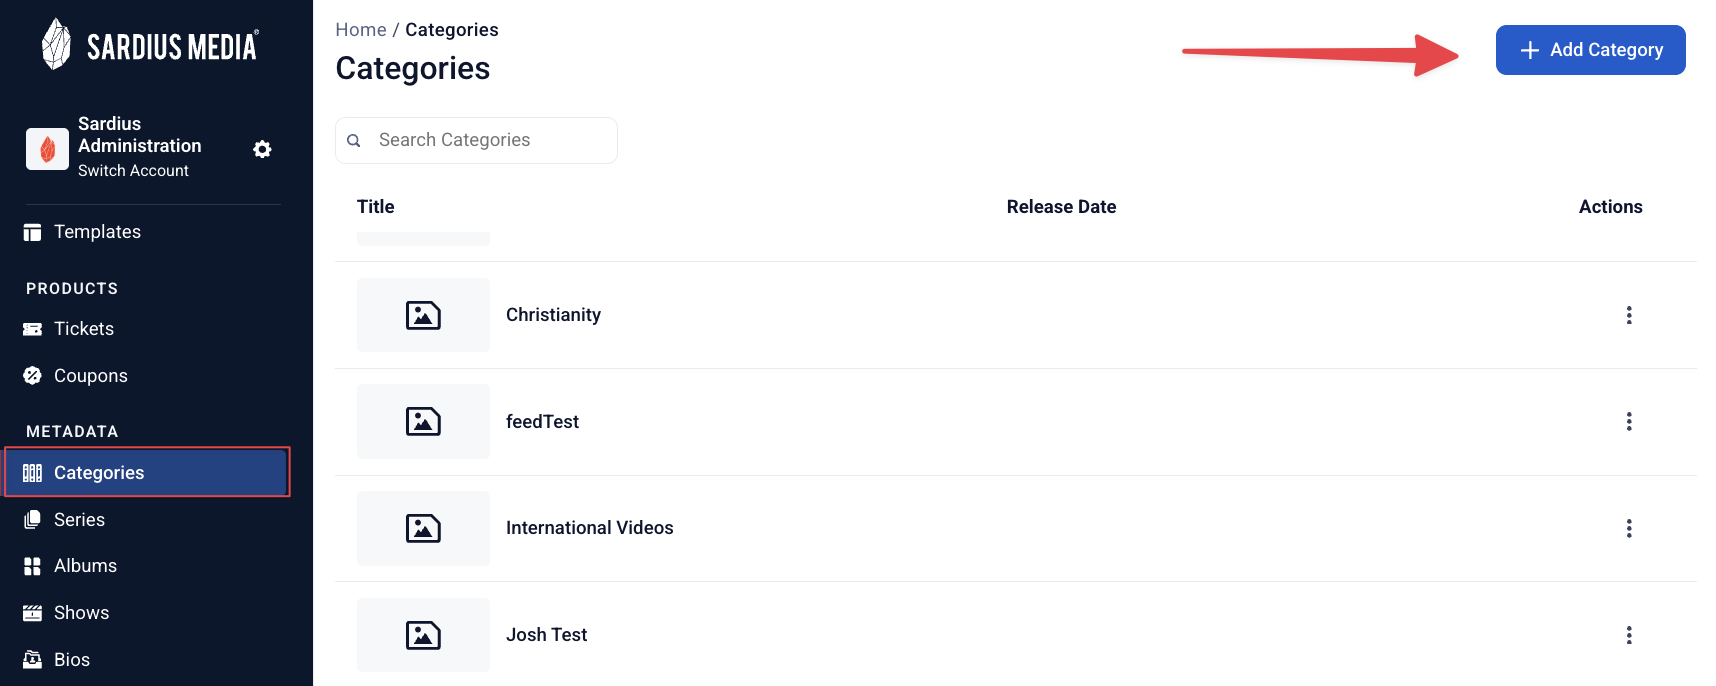
- Under Metadata → Categories in the Sardius Control Panel, In the left menu
- Create a Category that describes your podcast (e.g., "Sunday Sermons Podcast").
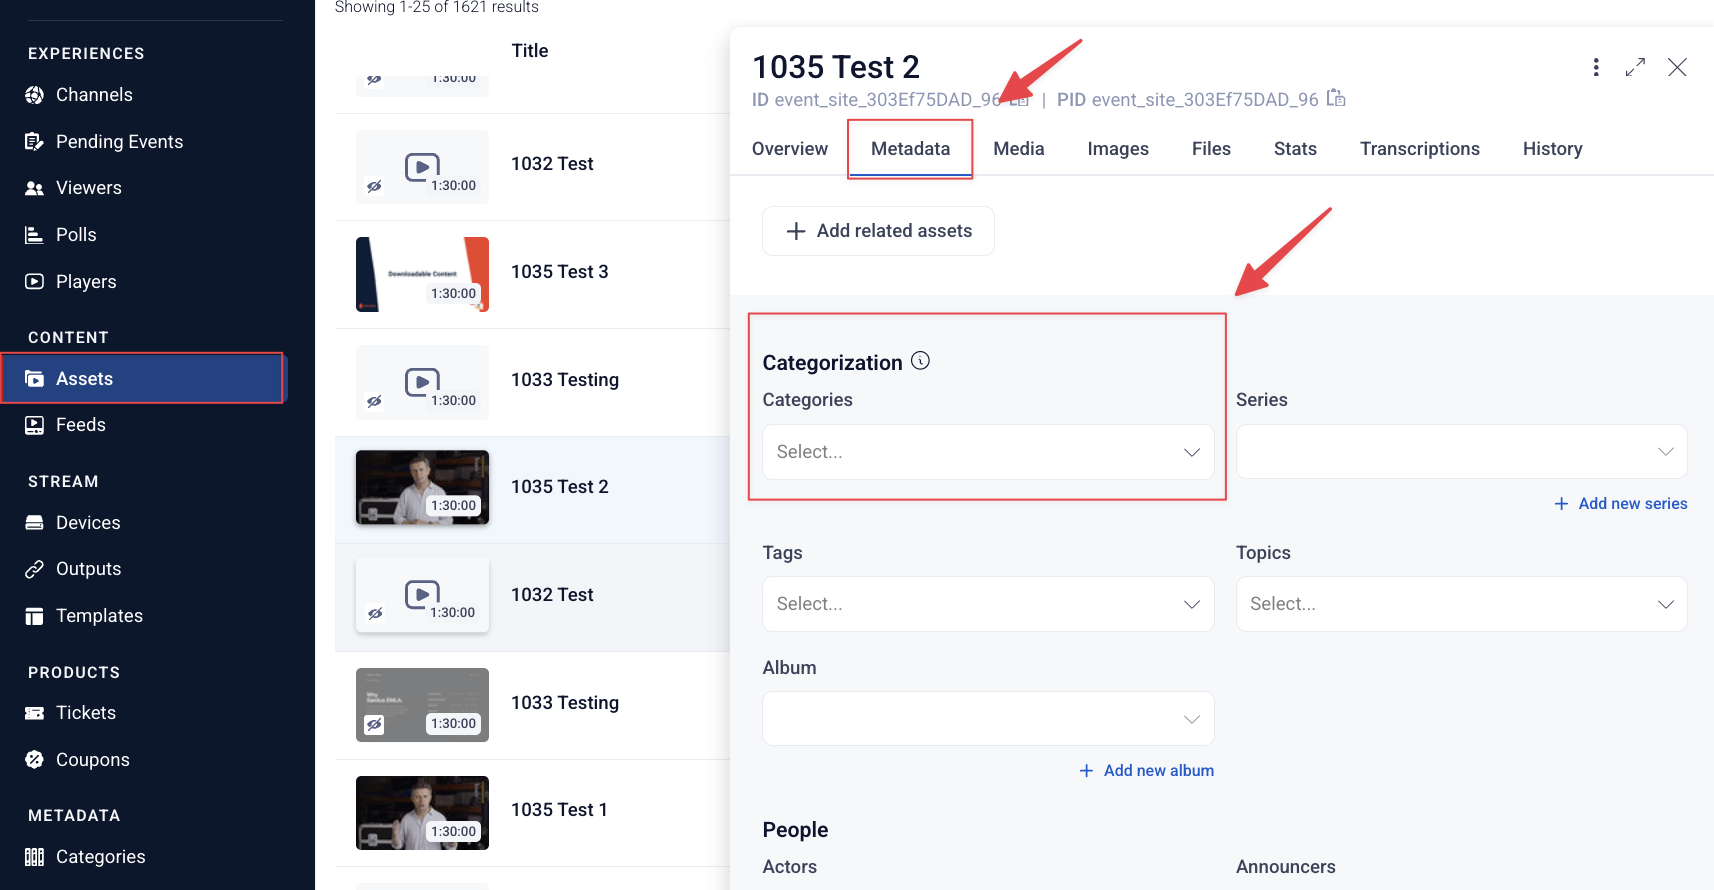
- On each asset that should be in the podcast, open the asset and apply that Category under the asset's Metadata tab.
Make sure each asset has an MP3 file
A podcast feed can only include media that exists on the asset. For an audio podcast, each asset needs an MP3 file.
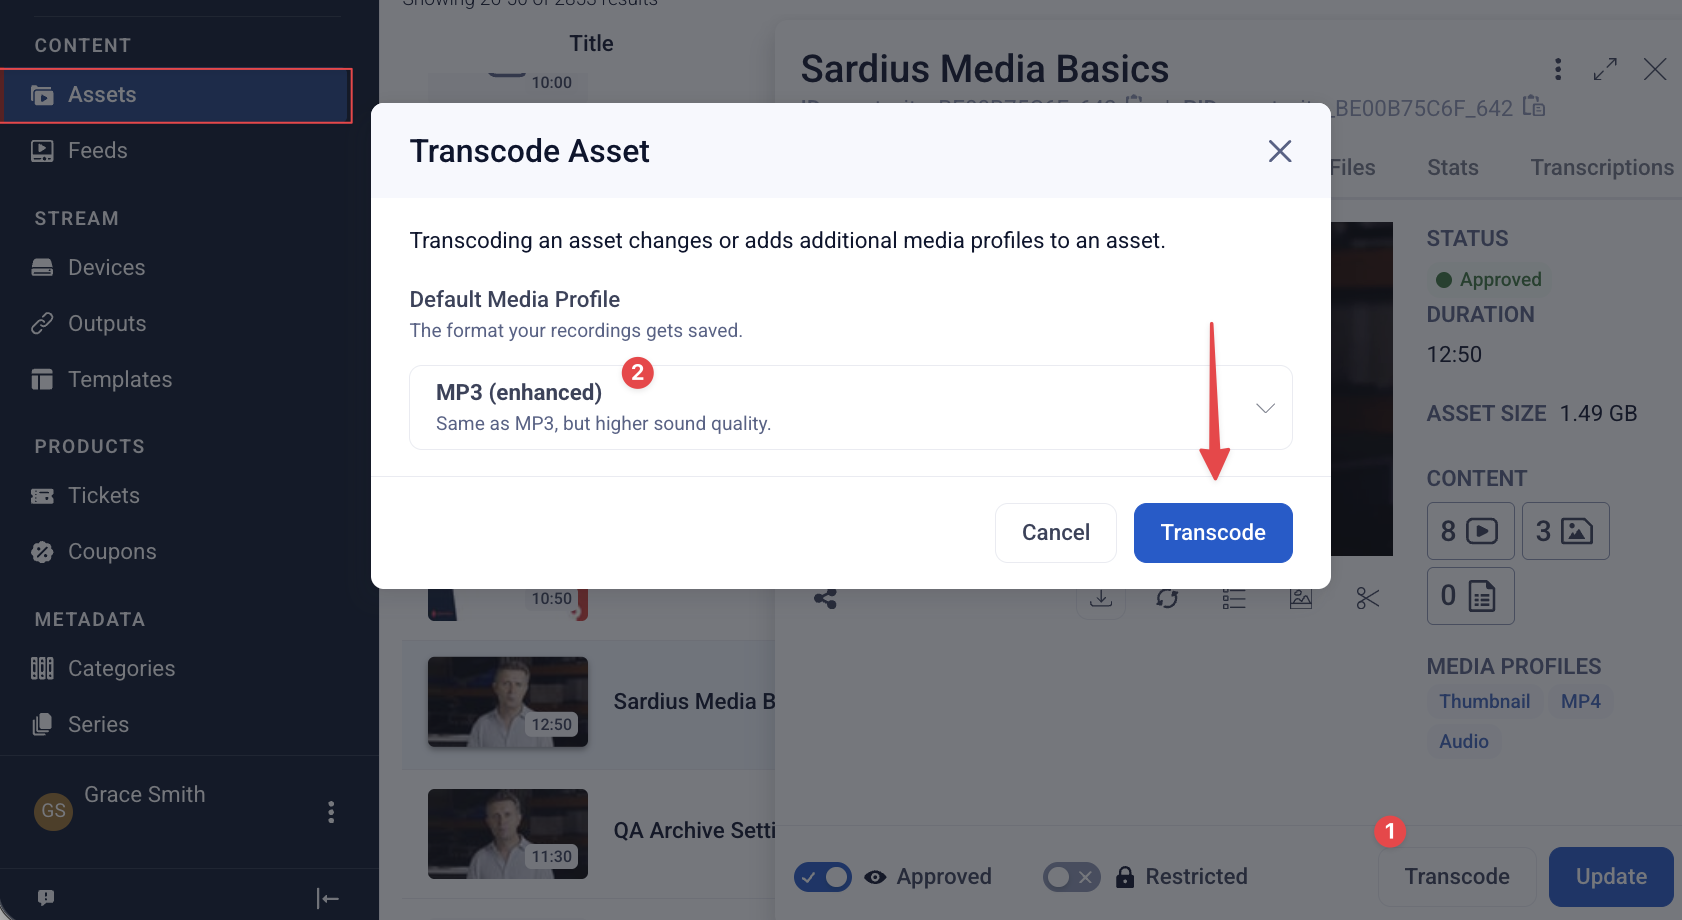
If your assets were uploaded as video, you'll need to transcode each one as MP3 as well:
- Open the asset.
- Click Transcode → MP3.
- Sardius will generate the MP3 from the video automatically.
Step 2: Create the Feed
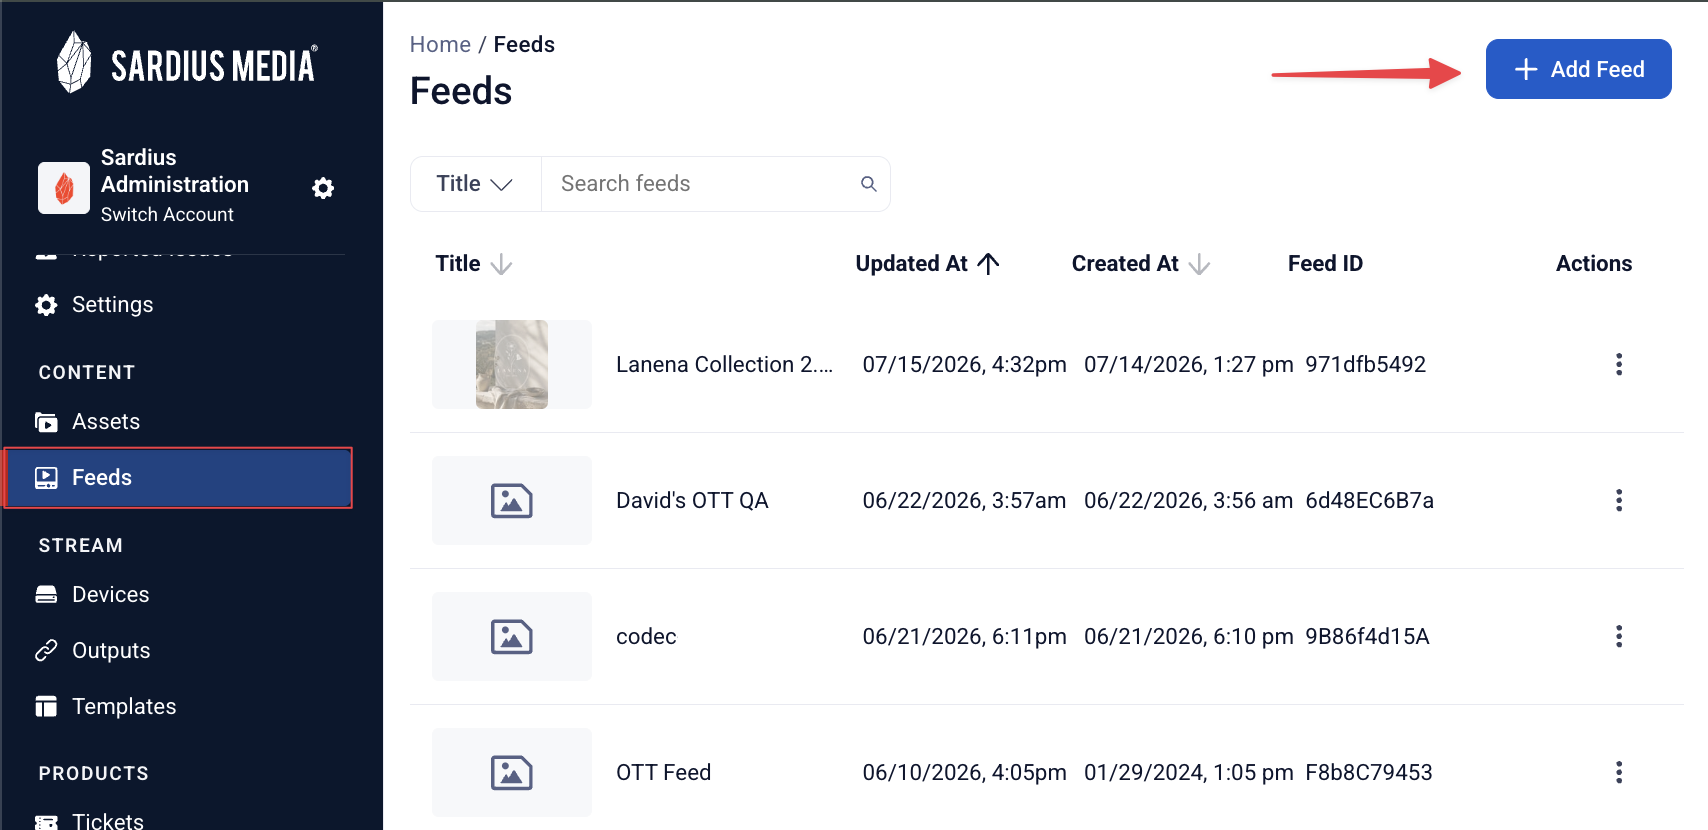
- In the Control Panel, go to Feeds in the left navigation under Content
- Click + Add Feed in the upper right.
- In the Add Feed modal:
- Feed Name — Internal name for your team. Not visible to listeners. (e.g., "Sunday Sermons Podcast")
- Release Date — Leave blank if you want the feed available immediately.
- Description — Internal use only. Not required.
- Click Add Feed.
Step 3: Add Your Assets to the Feed
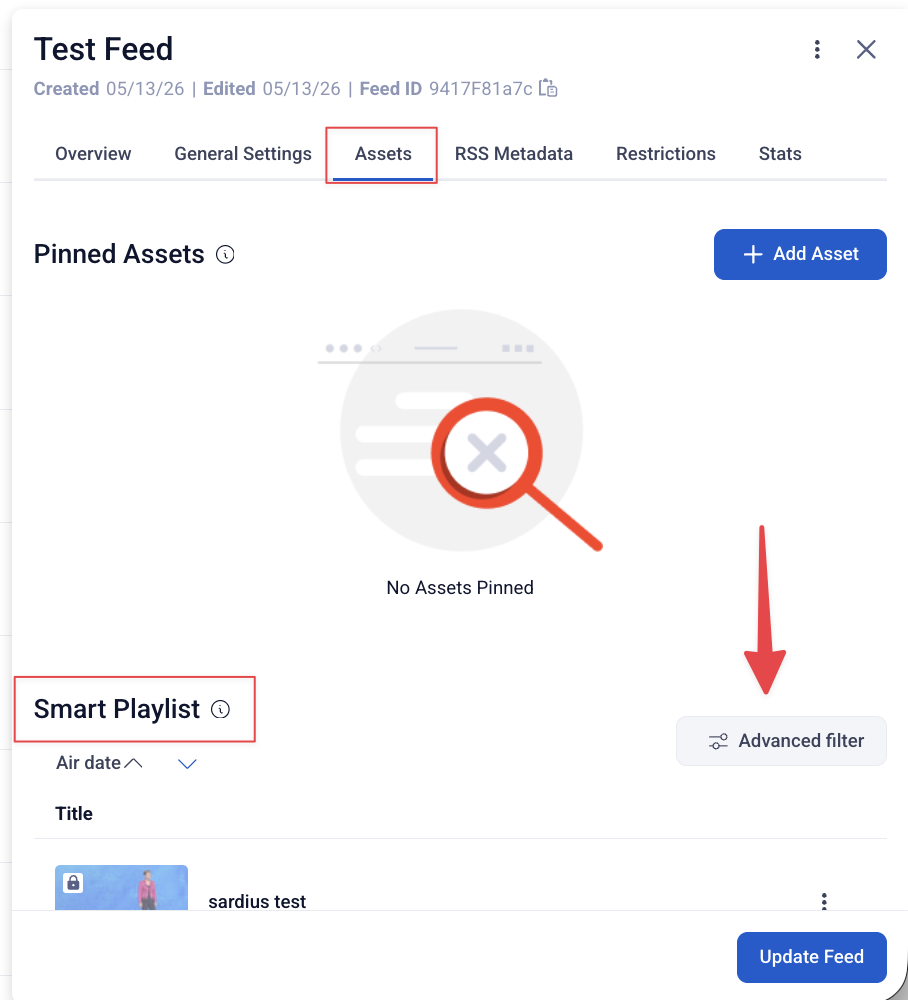
On the Assets tab, use the Smart Playlist with an Advanced filter to dynamically pull in your podcast episodes:
Smart Playlist with Advanced Filter (recommended)
This dynamically pulls in any asset that matches a filter, so new episodes appear in the feed automatically as you upload and tag them.
- In the Smart Playlist section, click Advanced filter.
- Set up a filter using Categories as the field and the name of your podcast category as the value (e.g., "Sunday Sermons Podcast").
- Click Show results.
- Click Update Feed at the bottom of the page to save.
Step 4: Configure Restrictions for Podcasts
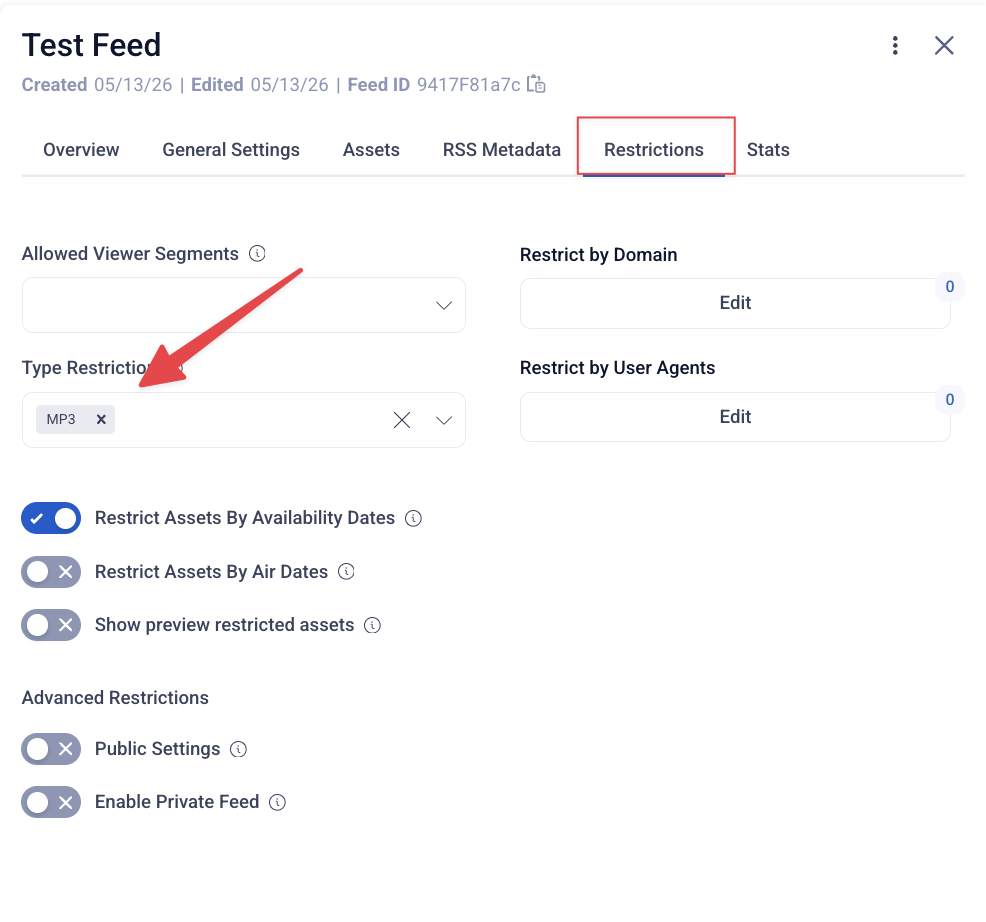
Two settings on the Restrictions tab are critical for podcast distribution:
-
In the Type Restriction dropdown, select MP3. This ensures only the audio version of each asset is included in the feed, even if the asset also has an MP4.
Without this, the feed may pull both audio and video versions, which most podcast platforms will reject.
Step 5: Fill Out RSS Metadata
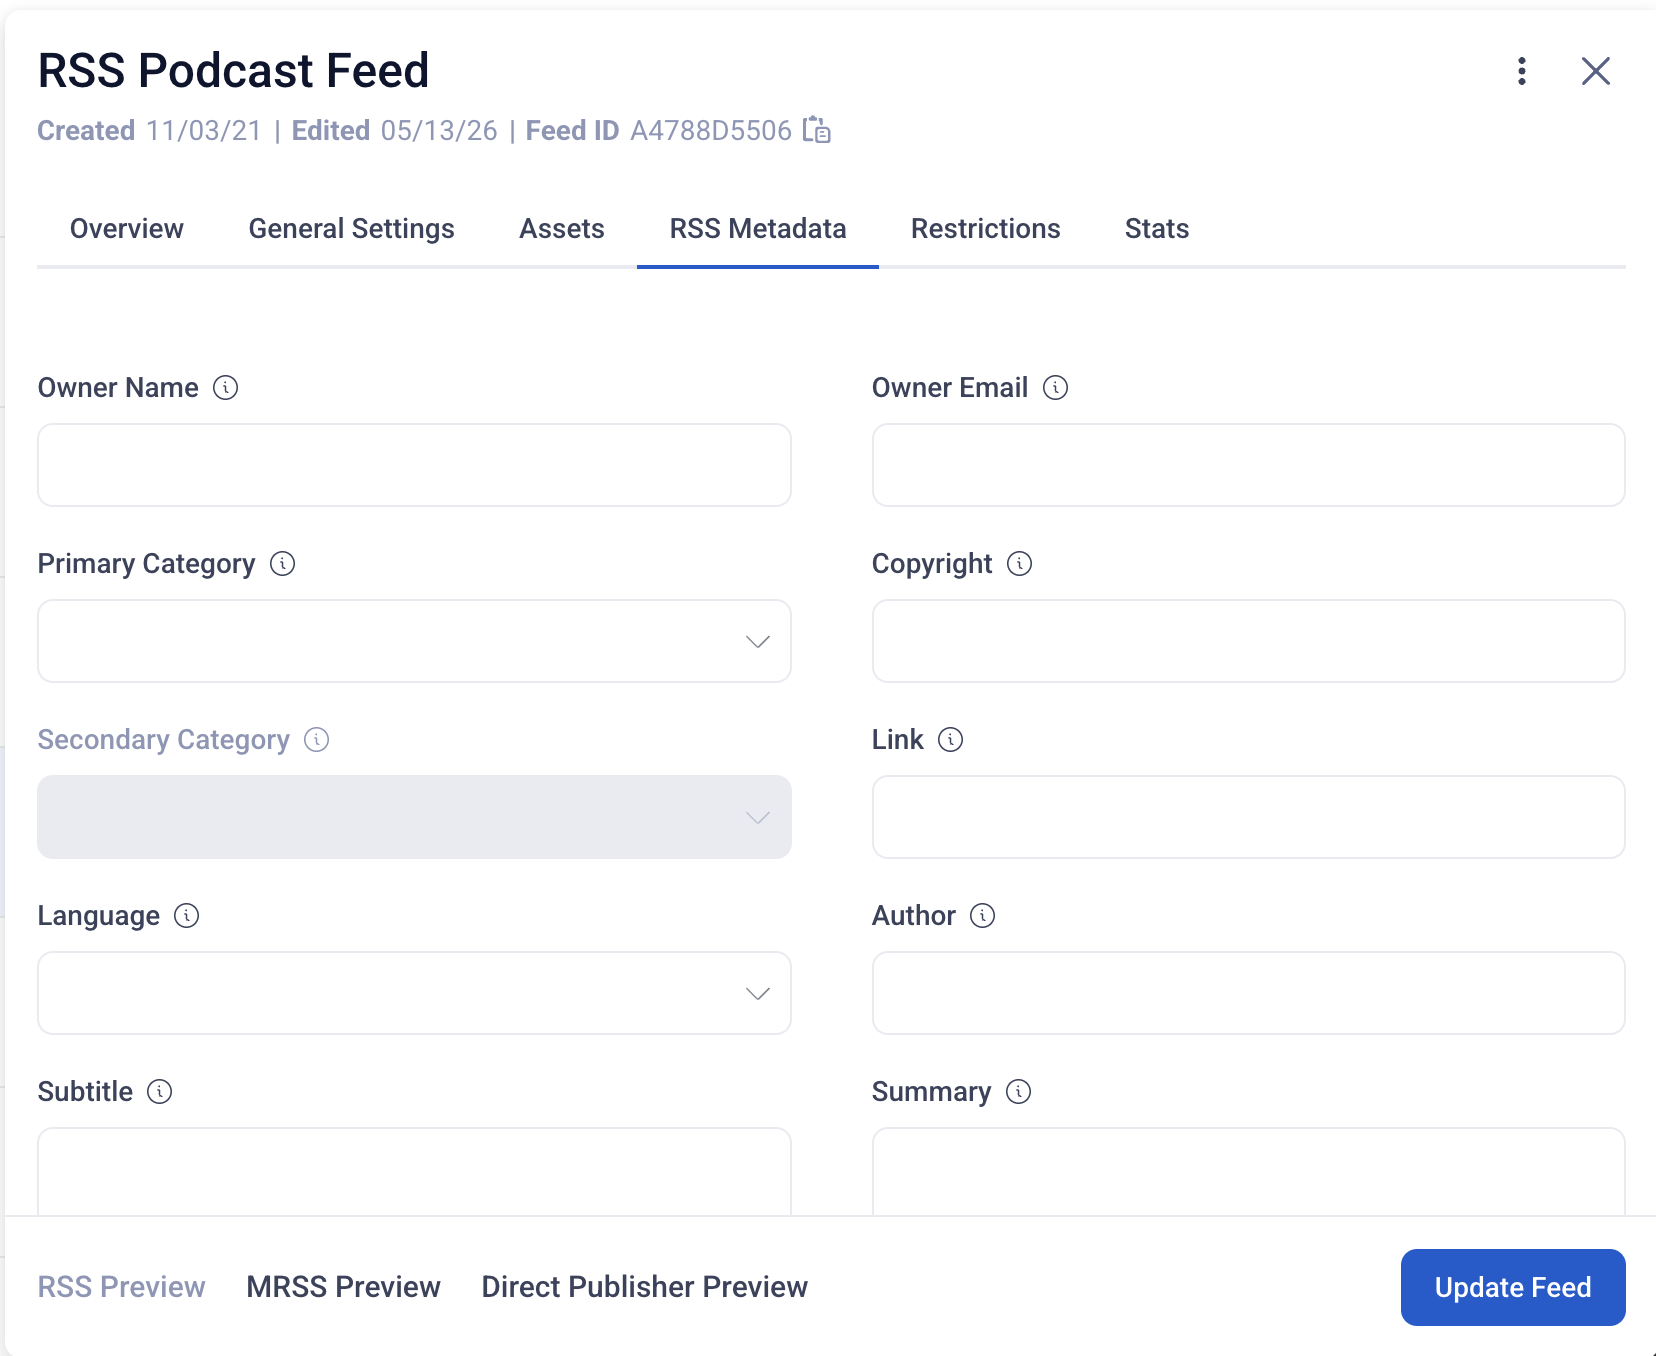
The RSS Metadata tab is what podcast platforms read when they ingest your feed. Apple Podcasts and Spotify will reject feeds that are missing required fields, so it's worth taking the time to fill this out completely.
We recommend filling out ALL metadata fields on the RSS Metadata page.
You'll also need to set a podcast artwork image under the Overview tab. This is what shows up as your podcast cover art on Apple, Spotify, and other platforms.
Click Update Feed to save.
Step 6: Approve Your Assets
This is one of the most common reasons a podcast feed appears empty.
On the Assets tab, look at the icons next to each asset:
- A check mark icon means the asset is not yet approved. Click it to approve.
- A "no" symbol means the asset is not transcoded and will not appear in the feed.
Only approved, transcoded assets show up in the live RSS feed.
Step 7: Get Your RSS URL and Validate
Before submitting to Apple or Spotify, validate your feed to catch any issues that would cause platform rejection.
-
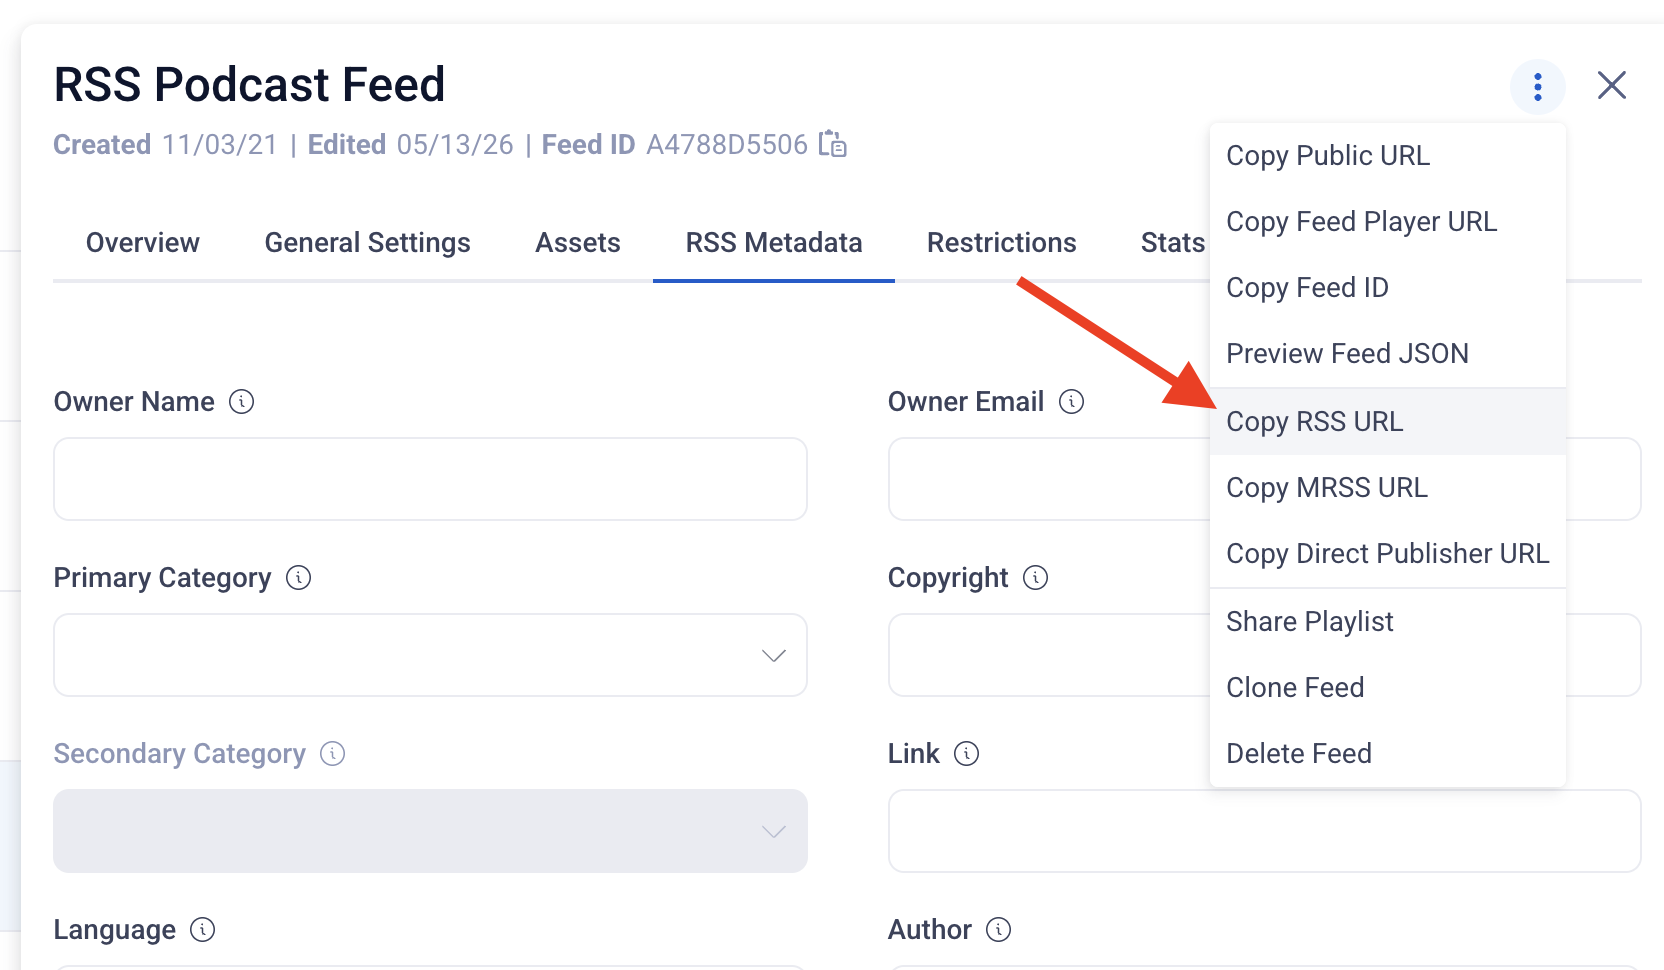
Click the three-dot menu in the top right of the feed panel and select the RSS URL option to copy your feed's RSS URL. The format is:
https://api.sardius.media/feeds/{accountId}/{feedId}/rss -
Paste the URL into a podcast validator:
- Podba.se — recommended
- Any RSS 2.0 validator
The validator will flag missing metadata, invalid characters, or empty fields. Fix any issues before moving on.
Step 8: Submit to Podcast Platforms
Once your feed validates cleanly, submit the RSS URL to each platform you want to distribute to.
Apple Podcasts
- Go to Apple Podcasts Connect.
- Click + → New Show.
- Paste your Sardius RSS URL.
- Apple will review your feed (typically a few days).
Spotify
- Go to Spotify for Creators.
- Add or claim a podcast.
- Paste your Sardius RSS URL.
Other platforms
Amazon Music, iHeartRadio, Overcast, Pocket Casts, and most other podcast directories accept RSS feeds the same way — paste your Sardius RSS URL into their submission flow.
Adding New Episodes Going Forward
Once your podcast feed is set up and live on the platforms, adding new episodes is automatic if you've used the Build Query method:
- Upload your new asset to Sardius.
- Transcode it as MP3.
- Apply your podcast Category under the asset's Metadata tab.
- Approve the asset.
The new episode will appear in your RSS feed within minutes, and podcast platforms will pick it up on their next refresh (typically 12–24 hours).