
Add Your Livestream to Pulse
Updated
By default, Pulse shows archived recordings after an event ends. If you'd also like your live stream itself to be visible in Pulse while it's happening, this guide walks you through setting that up.
Step 1: Find Your Live Stream's Asset
Every Channel automatically has an asset tied to its live stream.
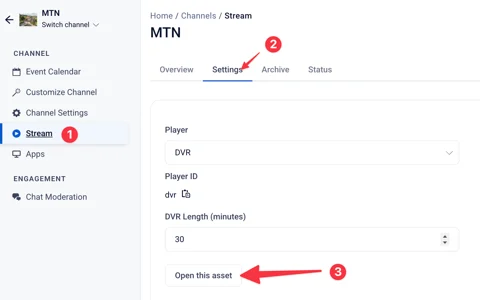
- On your campus's Channel, click Stream on the sidebar.
- Click Settings.
- Click Open this asset.
Step 2: Rename the Asset
Rename this asset to something clear — we recommend your campus code followed by "Livestream," for example: BAL Livestream.
Step 3: Tag the Asset
Just like any other Asset, add the Category and Series for this campus — the same tags you'd use for that location's regular archived content.
Step 4: Get It to the Top of the Feed
How you do this depends on how many campuses your organization has:
- Fewer than 25 campuses: Go to your Feed and pin the live stream asset to the top. This keeps it appearing first, every time.
- 25 or more campuses: Pinning won't work the same way at this scale. Instead, adjust the asset's air date to a date far in the future — for example, the year 2050. Since content sorts by air date, this keeps your live stream asset at the top of that campus's page in your Pulse Review Channel, every time.
Step 5: Verify It Worked
Feeds are cached to improve page load times. Check your Pulse Review Site after 15 minutes to verify that the Livestream asset is now showing.