
If you are wanting to set up a Makito X4 encoder, please review that specific article here.
This article will focus on creating an event on a Sardius channel using Sardius Stream, but you can also edit upcoming events that already exist on your calendar.
- If you would like information on how to set up you default channel stream settings, rather than edit one event, click here
Note: For best results, be sure that your event time will start AFTER your encoder starts to send to your event.
Sardius Channel Configuration
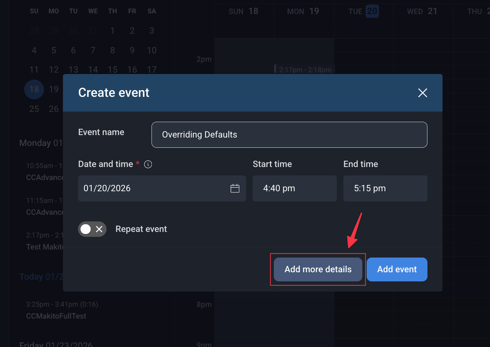
1. Access your Sardius Channel and start the event creation process. After entering your date, start time, and end time, click on "Add More Details"
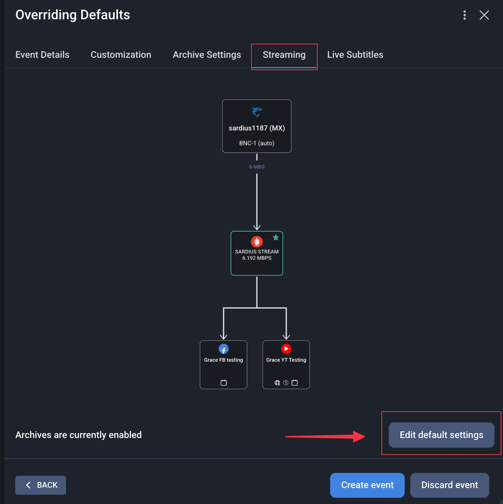
2. Select the Streaming Tab
3. Select "Edit channel defaults"
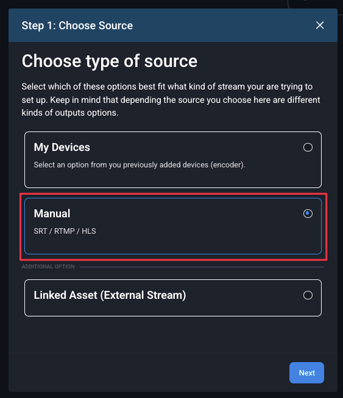
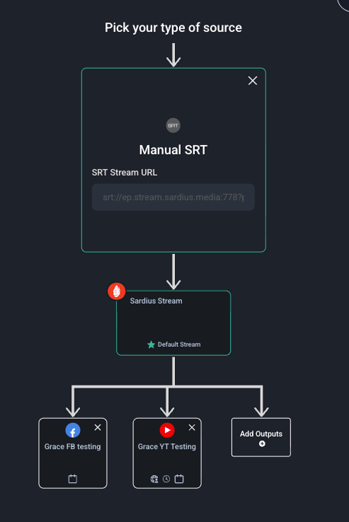
4. Choose manual source and select your SRT protocol

After clicking Next, you will be brought to the stream stepper overview.
Sardius Stream will be automatically selected and here you will have the option to add any necessary outputs
5.Add outputs by clicking the Add Outputs modal at the bottom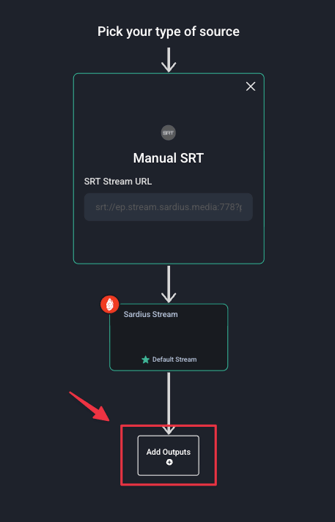
6. Save your settings by clicking Save in the top right corner if everything looks correct.
7. Copy the Stream URL and Stream Key
Here your stream credentials (RTMP/SRT URL and Stream Key) will be displayed.
Copy this code value and paste in a doc or text editor to easily break apart
Break apart SRT Stream URL
srt:// {URL} : {PORT} ?passphrase= {KEY} &streamid= {STREAM ID}
srt://ep.stream.sardius.media:778?passphrase=1fdb497c5f8ec88ec9898c22a026ce14k7f50d77bad9201e8b85ebf9d1b2e86a7 &streamid=7f50d77bad9201e8b85ebf9d1b2e86a7
- URL
- Port
- Key (using AES-256 encryption)
- URL: ep.stream.sardius.media
- Port: 778
- Key: 1fdb497c5f8ec88ec9898c22a026ce14k7f50d77bad9201e8b85ebf9d1b2e86a7
IMPORTANT: By default, Sardius channels are created with 3-digit ports. Makitos require a 4-digit port to operate. As you go through the process below and you notice that your channel has a 3-digit port, please contact Sardius Support to have a 4-digit port assigned to your channel.
Makito Configuration
- One free Video Encoder
- One free Audio Encoder
- Create an output
Video Encoder

We will use HD Video Encoder 0.
1. Select the appropriate input.
2. Enter the Basic Parameters
- Bitrate (Kbps): enter a number from 4000 to 6000.
- Resolution: leave as Automatic
- Frame Rate: leave as Automatic
- Framing: leave as IP
- GOP Size: This is your segment duration. Calculate based on your desired duration. For example, 30 fps at 4 seconds should be 120.
- 25fps / 4 seconds: 100
- 30fps / 4 seconds: 120
- 60fps / 4 seconds: 240

Note: These Bitrate and GOP Duration adjustments will permit Facebook and YouTube to accept the stream quality.
3. The Advanced Parameters should not be adjusted. If you would like to make adjustments, we recommend the following:


Audio Encoder

We will select Audio Encoder 0.
1. Select the appropriate input. Often, this will be SDI channels 1 and 2.
2. Adjust the Basic Parameters:
-
Channel Mode: Stereo
-
Bitrate: Select 192.
-
Sample Rate: leave as 48
-
AAC-LC Algorithm: leave as MPEG-2 ADTS
- Language: leave blank

Output

1. Enter a name for the Content
2. Select your source Video and Audio Encoders. These will be the same as the ones you set up earlier.

- Broadcasting Protocol: Change to TS over SRT
- Connection
- Mode: Caller
- Address: ep.stream.sardius.media (the same as what was in your SRT Stream URL you received from Sardius)
- Source Port: leave blank
- Destination Port: enter the Port number from the SRT Stream URL you received from Sardius
- SRT Settings
- Latency (in milliseconds): change to 2000
- Encryption: AES-256
- Passphrase: enter the Passphrase from the SRT Stream URL you received from Sardius

No further adjustments are needed. Click “Create” at the top of the screen. The output will start automatically.
You can return to the Outputs screen. If you see a green dot next to your Output, the output has successfully connected to our Connection Address URL and is transmitting.

Verify the Connection