
Note: Bios must be created first before they can be linked.
For more information on how to create a bio, click here
How to Connect a Bio to an Asset:
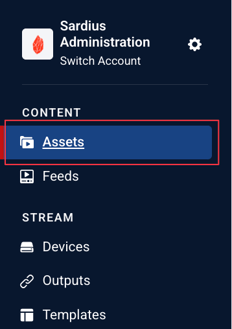
1. Go to Your Assets List
In the left navigation menu, select Assets to open your full library.
2. Choose the Asset You Want to Edit
Click on the asset’s name to open the asset editor.
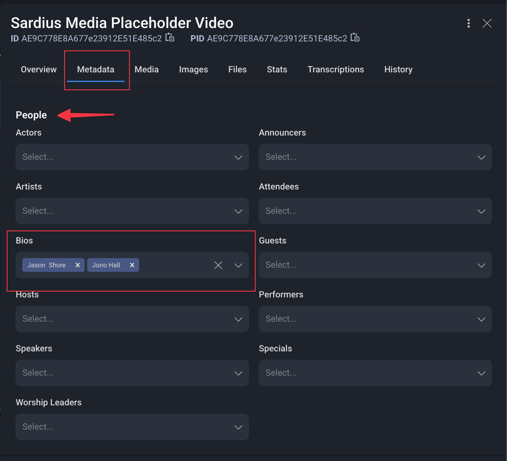
3. Scroll to the Bios Section (located in Metadata)
Inside the asset editor, locate the Bios area.
This section allows you to assign one or multiple bios to the selected asset.
4. Add a Bio
Click the dropdown and a list of available bios will appear. These bios are created in your Bio Library under Channel Settings.
Click on the name you want to connect and you will see it appear in the section. You can also delete any bio from this field by clicking the x next to their name.
5. Save Your Changes
Click Save or Update at the bottom to apply the connection.
Once saved, the connected bio(s) will appear on the asset’s detail page within the viewer experience.
Where Connected Bios Appear
When a bio is linked to an asset:
-
It displays below the video or media player on the asset view page from a Sardius Channel using a Collection layout
-
It includes the bio’s profile image, name, and description
-
Viewers can click on the bio to see additional information, if enabled
This helps viewers identify speakers, pastors, hosts, musicians, or contributors featured in your content.
Connecting an Asset to an Event
Assigning a bio to an event allows you to highlight the speakers, performers, hosts, or presenters associated with that specific live or scheduled event. When a bio is connected, viewers will see the person’s information directly on the event page—making it easier to understand who is involved and helping add professionalism and clarity to your event listings.
Follow the steps below to attach one or more bios to an event:
1. Go to the Events Section
Open your Event Calendar to view all scheduled events.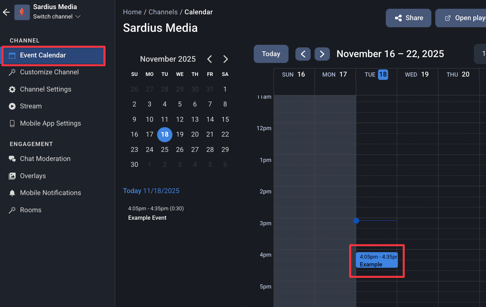
2. Select the Event You Want to Edit
Click on the event to open the event editor.
3. Scroll to the Bios Area
Inside the event settings, locate the Bios section.
This is where you can connect existing bios to the selected event.
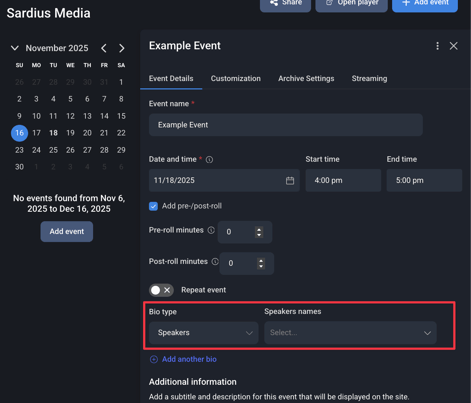
4. Add a Bio
Click the dropdown to open your list of available bios and Select the names you want to include.
These bios come from your Bio Library within Channel Settings.
5. Save Your Changes
Click Save to finalize the connection.
Once saved, the bios will appear on the event page within the viewer experience.
Tips for Using Bios Effectively
-
Keep bios updated so information remains accurate
-
Use images with consistent sizing for a polished look
-
Assign multiple bios to panel discussions, interviews, or group sessions
-
Double-check your spelling — bio names show publicly across the site
For more information on how to create a new bio, click here